Hop til indhold
  • Log ind
  • Opret konto
  • Varekurv
  • Gå til Kassen

Min Arduino

Ideer til undervisning med Arduino, Micro:bit eller ESP32

Søg efter:
1
TOTAL
  • Forside
  • Butik
  • Salgs- og leveringsbetingelser
  • Bøger
    • Kom godt i gang med Arduino
      • Om bogens indhold
      • Indholdsfortegnelse
    • Arduino, Android apps og Bluetooth
      • Om bogens indhold
      • Indholdsfortegnelse
    • Hjælp
      • Hjælp til download af programmer
  • P-1
    • Projekt 1A
    • Projekt 1B
    • Projekt 1C
    • Projekt 1C-2
    • Projekt 1D
    • Projekt 1D-2
    • Projekt 1D-3
    • Projekt 1E
    • Projekt 1F
  • P-2
    • Projekt 2A
    • Projekt 2B
    • Projekt 2C
  • P-3
    • Projekt 3A
    • Projekt 3B
    • Projekt 3C
  • P-4
    • Projekt 4A
    • Projekt 4B
    • Projekt 4C
  • P-5
    • Projekt 5A
    • Projekt 5B
    • Projekt 5C
  • P-6
    • Projekt 6A
    • Projekt 6B
    • Projekt 6C
  • P-7
    • Projekt 7A
    • Projekt 7B
    • Projekt 7C
    • Projekt 7D
  • P-8
    • Projekt 8A
    • Projekt 8B
    • Projekt 8C
    • Projekt 8D
    • Projekt 8E
    • Projekt 8F
    • Projekt 8G
  • P-9
    • Projekt 9A
    • Projekt 9B
    • Projekt 9C
  • P-10
    • Projekt 10A
    • Projekt 10B
    • Projekt 10C
    • Projekt 10D
  • P-11
    • Projekt 11A
    • Projekt 11B
  • P-12
    • Projekt 12A
    • Projekt 12B
    • Projekt 12C
    • Projekt 12D
    • Projekt 12E
  • P-13
    • Projekt 13A
    • Projekt 13B
    • Projekt 13C
    • Projekt 13D
  • P-14
    • Projekt 14A
    • Projekt 14B
    • Projekt 14C
    • Projekt 14D
    • Projekt 14E
  • P-15
    • Projekt 15A
    • Projekt 15B
    • Projekt 15C
    • Projekt 15D
  • P-16
    • Projekt 16A
  • P-17
    • Projekt 17A
  • P-18
    • Projekt 18A
    • Projekt 18B
  • P-19
    • Projekt 19A
    • Projekt 19B
    • Projekt 19C
    • Projekt 19D
    • Projekt 19E
  • Internet of Things (IoT)
    • Setup af D1 og D1 mini boards
    • Blink program på D1 eller D1 mini board
    • D1/D1 mini boards som webserver
    • D1, DHT11 sensor og ThingSpeak
    • D1 mini, DHT11 sensor shield og ThingSpeak
    • Test af D1 mini board med relay shield
  • Andre projekter
    • Måling af fugtighed i jord (tal/procent)
    • Manuel vanding
    • Automatisk vanding med en lille pumpe – Arduino UNO
    • Automatisk vanding med større pumpe
    • Prank Box
    • Ohmmeter
    • 12C Scanner
    • Rullende tekst med LCD1602
    • Digital lineal med LCD
  • Byg en bil (N/T)
  • Temperaturmålinger
    • Kontaktløs temperaturmåling
    • Temperaturmåling med DS18B20 (vandtæt sensor)
    • Temperaturmåling med TMP36
  • Power på robotbiler
  • BBC micro:bit
    • BBC micro:bit og servomotorer
      • BBC micro:bit og en servomotor (0-180 grader)
      • BBC micro:bit og to servomotorer (0-180 grader)
      • BBC micro:bit og en servomotorer (0-360 grader)
      • Ekstra menupunkt med nye blokke
      • BBC micro:bit og en servomotor (360 grader)
      • Micro:bit og to servomotorer (360 grader)
    • Micro:bit robotbiler
      • Robotbilen “Alfa-1” til Android
      • Robotbilen “Alfa-1” til iPhone
      • Robotbilen “Alfa-1” styret af en micro:bit
      • Line Follower Robot “Alfa-1a”
      • Robotbilen “Alfa-2” til Android
      • Robotbilen “Alfa-2” styret af en micro:bit
      • Line Follower Robot “Alfa-2a”
      • Robotbilen “Alfa-3” styret af en micro:bit
    • Anvendelse af lyssensor til micro:bit
    • Anvendelse af temperatursensor til en micro:bit
    • Automatisk vanding med micro:bit
    • Anvendelse af afstandssensor til micro:bit
  • Micro:bit radio control
    • Tænde og slukke LED med en ekstra micro:bit
    • En micro:bit styrer trådløst en DC motor
    • Micro:bit fjernstyrer servomotor
    • Micro:bit fjernstyrer trådløst to servomotorer
  • Arduino IDE og micro:bit
    • En micro:bit styrer trådløst en DC motor
    • Anvendelse af vandtæt temperatursensor til micro:bit
    • Kontaktløs temperatursensor til micro:bit
  • Micro:bit både
    • Hjuldamper styret af micro:bit
    • Motorbåd styret af en micro:bit
    • Speedbåd styret af en micro:bit
Max98357 3w Class D Amplifier Breakout Interface I2s Dac Decoder Module Filterless Audio Board For Raspberry Pi Es blue

Max98357 3w Class D Amplifier Breakout Interface I2s Dac Decoder Module Filterless Audio Board For Raspberry Pi Es blue

20,00 kr.

Ikke på lager

Varenummer (SKU): F856 Kategori: Forstærker
  • Beskrivelse

Beskrivelse

Product specifications:
Output power: 3.2W, 10%THD at 4_, 1.8W, 10%THD at 8_, with 5V power supply
PSRR:77 dB, typical value @1 KHZ
The sampling rate of I2s ranges from 8kHz to 96kHz
Don’t need MCLK
Click + popup to reduce
Five pin optional gain: 3dB, 6dB, 9dB, 12dB, 15dB
Excellent click and pop suppression
Hot shutdown protection
As an assembled and tested tap board, with a small optional head and 3.5mm terminal board. If connectors and strips are required, some welding will be required.
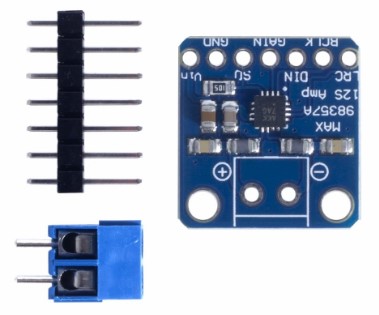
It takes the standard I2s digital audio input and not only decodes it into an analog signal, but also amplifies it directly into a speaker. Perfect for adding compact amplified sound, it takes 2 breaks (I2sDAC+AMP) and combines into one.
I2s (not to be confused with I2c), in the digital sound protocol used to transmit audio data on a circuit board. Many high-end chips and processors manage all audio in digital I2s format. Then, to input or output data, three or four pins (data input, data output, bit clock, and left and right channel selection) are used. Typically, for audio devices, there’s a DAC chip that takes the I2s and converts them into an analog signal that can drive a headset.
This small mono amplifier is surprisingly powerful — capable of delivering 3.2 watts of power to a 4 ohm impedance speaker (5 volts of power at 10%THD). Inside the microchip is a Class D controller capable of operating between 2.7V and 5.5Vdc. Because AMP is rated D, it is highly efficient and ideal for portable and battery-powered projects. It has built-in thermal protection and overcurrent protection, but we can barely tell it’s getting hot.
Audio input is I2s standard and can use 3.3V or 5V logical data. The outputs are “bridged” – meaning they are directly connected to the outputs, not grounded. The output is a square pulse width modulation of ~300kHz, then “averaged out” by the speaker coil — no high frequencies are heard. All of this means that you can’t connect the output to another amplifier, it should drive the speaker directly.
There is a gain pin that can be manipulated to change the gain. By default, the amplifier will give you a gain of 9 dB. Gain pins can be set to 3dB, 6dB, 9dB, 12dB, or 15dB by directly connecting pull-up or pull-down resistors or wires.
The Shutdown/Mode pin can be used to put the chip in the off state or to set which I2s audio channel is piped to the speaker. By default, the amplifier mixes the output (L+R) /2 stereo to the mono output. By adding a resistor, you can change it to output just left or right.
Works with Raspberry Pi, Arduino Zero, and any other microcontroller or microcomputer with I2s audio output.
Dur ikke til Arduino UNO – manglerI2s audio output. 

Relaterede varer

  • LM386 audio power amplifier module

    LM386 audio power amplifier module

    32,00 kr.
    Tilføj til kurv
  • PAM8403 mini 5V digital amplifier board with switch potentiometer

    PAM8403 mini 5V digital amplifier board with switch potentiometer

    30,00 kr.
    Tilføj til kurv
  • PAM8403 Super Mini Digital Amplifier Board

    PAM8403 Super Mini Digital Amplifier Board

    10,00 kr.
    Tilføj til kurv

© 2025 Min Arduino | All Rights Reserved